Incense, a fragrant substance typically burned for its aroma, has been used for centuries in various cultures for religious, spiritual, and aesthetic purposes. While commercial incense sticks are readily available, crafting your own can be a rewarding and personalized experience. This guide will walk you through the steps of making DIY incense sticks, from selecting materials to crafting your unique blends.
Choosing the Right Materials
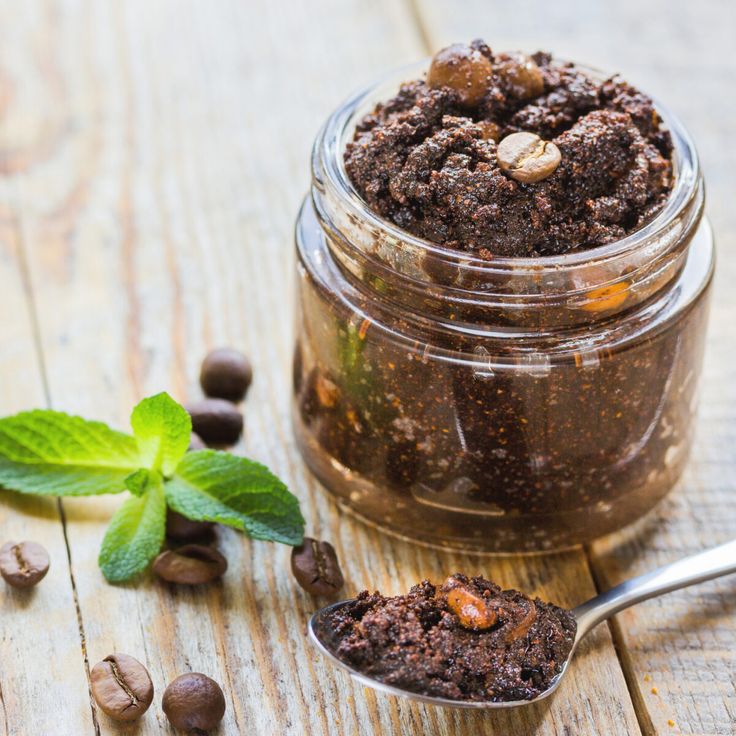
The foundation of your DIY incense sticks is the base material. Traditional options include sandalwood, agarwood, frankincense, and myrrh. These woods offer distinct scents and burning properties. For a more accessible starting point, consider using pre-made incense cones or incense paste.
Preparing the Base
If you’re using wood or pre-made cones, you’ll need to prepare them. For wood, cut it into thin strips or use a grater to create a fine powder. If using cones, crush them into smaller pieces.
Mixing the Ingredients
In a bowl, combine the base material with your chosen essential oils. Use a spoon or your fingers to mix the ingredients thoroughly until the oils are evenly distributed. You can adjust the amount of essential oils to control the fragrance intensity.
Shaping the Sticks
You can shape your incense sticks using various methods. One popular technique is to roll the paste into thin cylinders between your palms. Another option is to use a piping bag or a syringe to extrude the paste into desired shapes.
Drying the Sticks
After shaping the sticks, allow them to dry completely. This can take several hours or even days, depending on the thickness and humidity. You can place the sticks on a rack or hang them to promote air circulation.
Testing and Tweaking
Once the sticks are dry, it’s time to test them. Light one end of the stick and allow the flame to consume the tip. The stick should ignite and burn slowly, releasing a steady stream of fragrance. If the sticks burn too quickly or too slowly, you may need to adjust the binder or the amount of essential oils.
Rolling the mixture into sticks
Rolling the incense mixture into sticks is a common technique for shaping DIY incense. Here’s a step-by-step guide to help you achieve a consistent and well-formed product:
- Prepare your workspace: Ensure you have a clean, flat surface to work on. You might also want to use a rolling pin or a cylindrical object to assist in shaping the sticks.
- Adjust the consistency: The mixture should be pliable but not too sticky. If it’s too sticky, add a bit more binder. If it’s too dry, add a small amount of water or another suitable liquid.
- Divide the mixture: Portion the mixture into equal-sized pieces, depending on the desired length of your sticks.
- Start rolling: Take one piece of the mixture and place it on your workspace. Use your palms to roll the mixture back and forth, applying gentle pressure.
- Shape the stick: As you roll, guide the mixture into a cylindrical shape. You can use a rolling pin or a cylindrical object to help maintain a consistent diameter.
- Smooth the surface: Continue rolling until the stick is smooth and even. If there are any cracks or uneven spots, gently press them together.
- Adjust the length: Use a knife or scissors to cut the stick to your desired length.
- Repeat: Repeat these steps with the remaining portions of the mixture to create the desired number of sticks.
Tips for Rolling:
- Moisturize your hands: A little moisture on your hands can help prevent the mixture from sticking.
- Be patient: Rolling the sticks may take some practice, so don’t get discouraged if they aren’t perfect at first.
- Use a rolling pin: A rolling pin can be helpful for achieving a more uniform shape.
- Experiment with techniques: Try different techniques, such as using your fingers or a piping bag, to find what works best for you.
By following these steps and incorporating the tips, you can successfully roll your incense mixture into well-formed sticks that are ready to be dried and enjoyed.
Customizing Your Incense
The beauty of DIY incense sticks is the ability to personalize them. Experiment with different base materials, essential oils, and binders to create unique blends. You can also add herbs, spices, or flowers for additional fragrance and visual appeal.
Customizing DIY incense sticks
One of the great joys of making DIY incense sticks is the ability to personalize them to your unique preferences. Here are some ways to customize your creations:
Choosing Base Materials:
- Traditional woods: Sandalwood, agarwood, frankincense, and myrrh offer distinct scents and burning properties.
- Alternative materials: Explore other options like cedar, pine, or even herbs like lavender or rosemary.
- Pre-made incense: Use pre-made incense cones or paste as a base and add your own essential oils and binders.
Selecting Essential Oils:
- Scent profiles: Choose essential oils that complement each other and create your desired scent profile.
- Therapeutic benefits: Consider the therapeutic properties of different essential oils, such as lavender for relaxation, peppermint for energy, or eucalyptus for clearing.
- Experimentation: Don’t be afraid to experiment with different combinations and ratios of essential oils to find your perfect blend.
Adding Binders:
- Traditional binders: Gum arabic, honey, and water are common binders.
- Alternative binders: Try other natural binders like beeswax or plant-based gums.
- Consistency: Adjust the amount of binder to achieve your desired consistency.
Incorporating Other Ingredients:
- Herbs and spices: Add herbs like chamomile, rosemary, or thyme for additional fragrance and therapeutic benefits.
- Flowers: Incorporate dried flowers like rose petals or lavender buds for visual appeal and a delicate scent.
- Resins: Use resins like copal or benzoin for a smoky, sweet fragrance.
- Crystals: Add small crystals like amethyst or clear quartz for energetic properties and aesthetic appeal.
Shaping and Decorating:
- Traditional shapes: Roll the paste into thin cylinders or use a piping bag to create various shapes.
- Creative shapes: Get creative and experiment with different shapes like spirals, hearts, or stars.
- Decorations: Add decorations like glitter, dried flowers, or essential oil-soaked beads.
Testing and Refining:
- Experimentation: Try different combinations of ingredients and techniques to find your perfect formula.
- Testing: Light the incense sticks and evaluate the scent, burn rate, and overall performance.
- Refinement: Make adjustments as needed to improve your creations.
Remember, the possibilities for customization are endless. Have fun experimenting and creating unique incense sticks that reflect your personal style and preferences.
Safety Tips
- Always light incense sticks on a heat-resistant surface.
- Never leave burning incense unattended.
- Keep incense sticks away from flammable materials.
- Store incense sticks in a cool, dry place
Safety precautions when making and using DIY incense sticks
Making DIY incense sticks can be a rewarding experience, but it’s essential to prioritize safety. Here are some precautions to keep in mind:
While Making:
- Avoid inhaling essential oils: Many essential oils are potent and can be irritating when inhaled in large quantities. Work in a well-ventilated area or wear a mask.
- Handle chemicals with care: If using any chemicals as binders or preservatives, follow the manufacturer’s safety guidelines. Wear gloves and avoid contact with skin.
- Keep away from heat sources: The drying process for incense sticks should be done in a cool, dry place away from heat sources like stoves or heaters.
When Using:
- Use a fire-resistant surface: Always place burning incense sticks on a heat-resistant surface like a ceramic plate or metal dish to prevent fires.
- Keep away from flammable materials: Ensure that burning incense sticks are kept away from curtains, papers, or other flammable materials.
- Never leave unattended: Never leave burning incense sticks unattended, as they can pose a fire hazard.
- Extinguish properly: To extinguish a burning incense stick, use a damp cloth or your fingers to pinch out the flame.
- Beware of smoke: Incense smoke can be irritating to some people. Ensure proper ventilation and avoid burning incense in enclosed spaces if you have respiratory issues.
- Keep out of reach: Store incense sticks and materials out of the reach of children and pets.
By following these safety precautions, you can enjoy making and using DIY incense sticks without compromising your safety or the safety of others.
Crafting DIY incense sticks is a rewarding and creative endeavor. By following these steps and experimenting with different ingredients, you can create personalized fragrances that enhance your home, meditation practices, or spiritual rituals. Enjoy the journey of discovering your own aromatic preferences and the satisfaction of creating something truly unique.